FMEA (Failure Mode Effects Analysis): How to analyze potential failures in a design
Failure Mode and Effects Analysis (FMEA or AMFE in Spanish) is one of the most common tools in Quality Engineering to detect and solve potential failures in the development of a new product or service. In this article we are going to explain the concept of FMEA and then, we will see how to use it with an example.
What is FMEA?
Failure Mode Effects Analysis is a methodology that is applied during the design of new or improved products, services or processes. Its purpose is to study the potential future failures or potential problems (“failure modes”) of our product and then classify them according to their importance.
From there, we will get a list with the most relevant “failure modes”, so we will know what are the aspects that we should solve first, because they are more annoying (or dangerous) for the customer, more difficult to detect or more frequent. We will also know which ones are the less relevant, these ones are the less important and we should not be worried about them, because they have very little negative impact or because they are easy to detect by the machines or control quality inspectors before taking the product to the market.
There are several types of FMEA analysis. It depends on if it applies to a product / service or to a process, but basically they are very similar. In addition, this analysis can be applied in a new product development and also in improvements, modifications or processes optimization.
How to create a FMEA?
The steps to create and use a FMEA analysis are these ones:
1) List all potential failure modes
The first step is to create a working group of 4 or 5 people who have knowledge about the product / service / process that is being developed. Ideally, the group should be multidisciplinary and it should include several different profiles, as designers, engineers, technicians and even clients and customers and users. This is going to help to get a broad vision and obtain different points of view.
Once we have made our working group, we have to list all “failure modes” of the design: the failures that could have the final product (they can be functional, safety or esthetic defect and any kind of potential problem). To do this it is recommended to separate the product into its pieces and see how they could fail. You also have to think about what is the expected use of the product: Is it for experts or for novel users? Is it going to be used in critical situations? What if the customer uses it without reading the instructions? If it breaks could someone get hurt?
2) Set the priority of each failure mode
Once finished the previous step, we will have a long list with the potential failure modes of our product. These should be included in a table.
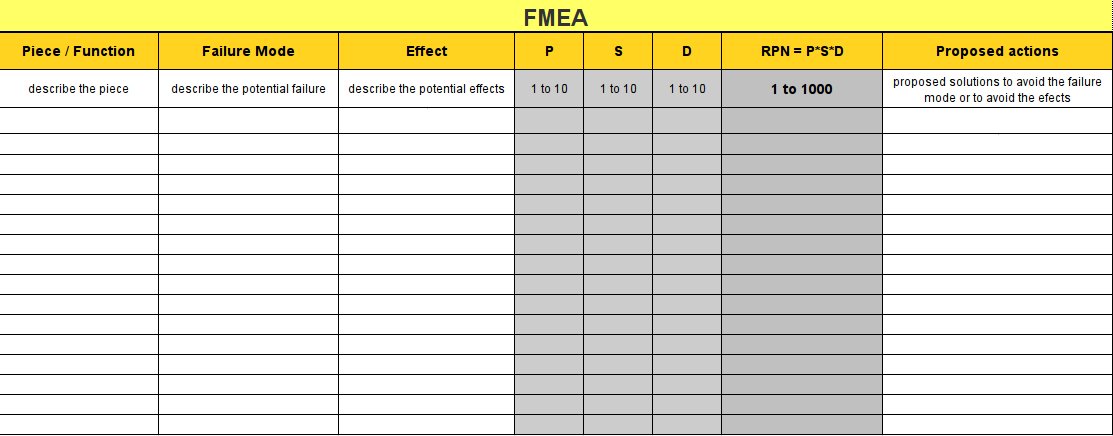
Now, it’s time to sort them by importance, so we will give to each failure mode the next three values:
S: Severity (extent of the problem perceived by the user).
P: Probability of happening.
D: detection probability (probability of NOT detecting the problem before using the product).
For each failure mode we will assign a value of P, S and D between 1 and 10. For example, on a TV, the “failure mode = power cable break” could have S = 7 (a high value, because the TV would be useless and it can also be a risk of electrocution for the customer), P = 2 (a low value, because it is very improbable) and D = 1 (a very low value because the probability of NOT detecting that the cable is broken during the quality test is very low).
Once estimated P, S and D, we have to multiply them to get the RPN (Risk Priority Number), which will give us a value between 1 and 1000.
RPN = S * P * D
This value will tell us the importance of each failure mode.
3) Prioritize the failure modes and propose solutions
Once calculated the Risk Priority Number for all failure modes, we order them. The higher RPN are the more important ones, so these are the failure modes than we should solve before (for example, you can find solutions for all failure modes higher than 600).
If we determine that a particular failure mode is unaffordable (RPN too high), we have three ways to reduce their risk:
• Acting for that if it happens, it will be less severe (and then decrease its S value).
• Acting to make it happen less frequently (and then decrease its P value).
• Acting for that if it happens, we will detect it before delivering the product to the customer (and then decrease its D value).
With this, we can compare the “initial RPN” (before applying FMEA method) with its “final RPN” (RPN we have obtained after acting to reduce the risk of the failure mode).
The objective of FMEA analysis is to have controlled all possible failures, having acted to reduce the most important risks.
An FMEA example
We are going to apply the Failure Mode Effects Analysis to design a lamp. The steps to develop the analysis are as follows:
1) Enumerate all failure modes
Our experts’ team has agreed that the potential failures of our lamp are:
• That its painting has defects (aesthetic failure).
• The switch breaks, so the bulb does not light (functional failure).
• The lamp structure breaks (functional failure).
• The glass that protects the bulb breaks (aesthetic failure).
• The wires break (functional and safety failure).
• The lamp may fall down and breaks the bulb (functional failure).
• The switch could be not visible and the user does not know how to light the lamp (it’s not a failure, but we can consider it as a failure because this kind of things happens frequently).
2 ) Establish the priority list
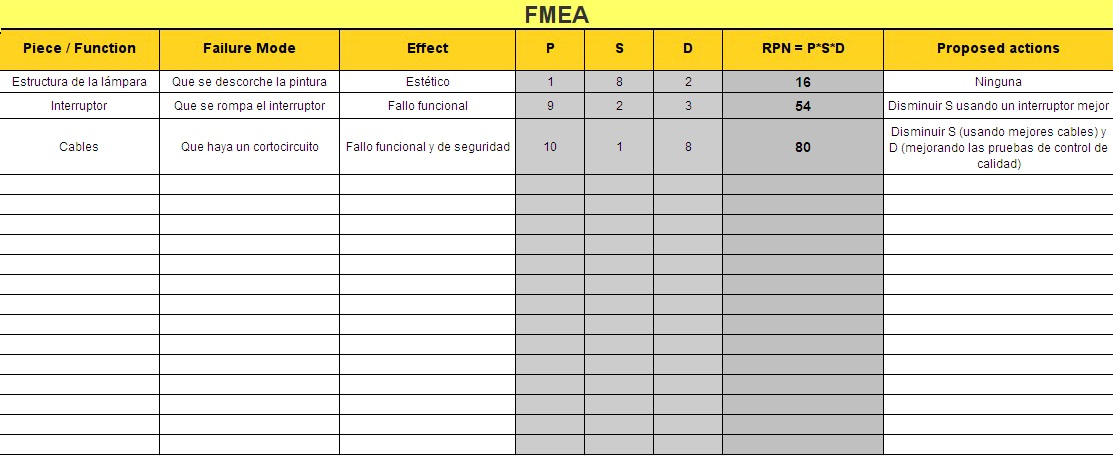
Now we assign to each failure mode the S value (severity), P (probability of happening) and D (detection probability). We then calculate the RPN (Risk Priority Number):
• That its painting has defects: S = 1 (bit serious for the user / user does not care too much), D = 8 (common failure, more than 2% of cases), D = 2 (easy to detect, we can see if the paint is well applied before selling the lamp).
• The switch breaks so the bulb does not light: S = 9 (severe for the user, as it will be dissatisfied), D = 2 (rare, in 0.2% of cases), D = 3 (easily detectable by testing it before selling the lamp).
• Broken wires: S = 10 (very severe, risk of damage and the lamp stops working). D = 1 (very rare, less than 0.05%% of cases), D = 8 (hard to detect, as it is a mistake that can happen months after selling the product for various reasons).
• etc…
A spreadsheet can help to organize the data:
– Download FMEA template (excel)
– Download FMEA template (Open Document)
3) Find solutions for the most important failure modes
Once calculated the RPN (1 to 1000) for all failure modes, we study the higher values:
In the example, the RPN is very low because one or two of the variables have been too low:
• Broken wires: RPN = 80. It is the most important failure mode. We could take actions to reduce S using better wires and P could decrease with more strict quality tests.
• The switch breaks so the bulb does not light: RPN = 54. To reduce RPN we can reduce S using a more robust switch that gives us less failures.
• Painting defects: RPN = 16. It’s not an important failure mode, so we do not need to take any action.
Finally, we have to define the goal we want to achieve in each failure mode after the improvement actions (we can establish a goal value for the Risk Priority Number). For example, we could establish that the failure modes that affect the safety, RPN should be less than 50 of 1000 and for those which do not affect to the safety , RPN have to be less than 70 of 1000.
Original post http://www.pdcahome.com/3891/amfe-guia-de-uso-del-analisis-modal-de-fallos-y-efectos/